This blog documents the modifications necessary to get seaworthy (warts and all), then the adventures (hopefully) on board our Trailer Sailer 6.1 metre Jarcat6 Catamaran, Kismet.

Thursday 14 December 2017

Stainless Steel Screws for Christmas

To keep the transom reinforcing project going over Christmas I have ordered (from Bolts Nuts Screws Online):

Product Price Qty Subtotal
316 STS CSK PHIL: #10 X 3.1/2 0.85 10 8.50
316 STS CSK PHIL: #10 X 3 0.73 10 7.30
316 STS PAN PHIL: #10 X 1/2 0.14 10 1.40
316 STS CSK PHIL: #12 X 1/2 0.22 10 2.20
316 STS PAN PHIL: #12 X 5/8 0.20 10 2.00

Essentially it's enough stainless steel screws to hold the rear traveller down into every layer of timber on the transom - regardless.

The 'I' section traveller (for the main sheet) on the transom is Ronstan I-Beam 19 and is 24mm high.
There is a 7mm gap to the  top piece of timber of the transom.
The top piece of timber is anywhere from 35mm to 25mm high (35mm in the middle - the highest load point).
The lower section of the transom is about 40mm high.

So 24+7+35 = 66mm
To make the screw "bite" all the way to the lower part of the transom my 3 1/2" (or 88mm) screws will give around 22mm of penetration.
I'll use the 76mm screws as the top timber gets thinner.
All screws will be epoxied in. If I ever have to remove it - well I'll cross that bridge...

By the way. The existing screws are 50mm long - losing 30mm before they hit timber. The two I tried this morning are modestly thumb and forefinger tight with traces of silicone on the threads -  and NO NYLON INSERTS. It's stainless steel on aluminium. (There are nylon inserts on the Jib sheets travellers - I have found several sources of them online.)

My next challenge is where to get 7mm deep hardwood about 35-30mm wide.
Hopefully I'll get to that over the Christmas new year break. I've found a couple of timber machinists and custom molding places reasonably nearby. (I only have a manual power plane and I'd have to take 10mm down to 7mm evenly for a couple of meters - not likely - but possible.)

The #12 screws are for the rudder box lower gudgeons where you can't use bolts. (They were 6g countersunk with flat washers and were almost useless).
12g screws are 5.5mm to the outer part of the thread so should hold a lot better.
I got Countersunk (CSK) and Panhead (PAN) just in case one works better than the other. The 5/8" might just fit with a flat washer under them. The rudder box timber is 12mm, the gudgeon 2mm so I'd have to take up another 1.9mm to stop the screw poking through. If if doesn't look right I'll use the 1/2" (I'll check before screwing the 5/8" in).

Sunday 10 December 2017

Rear Traveller support

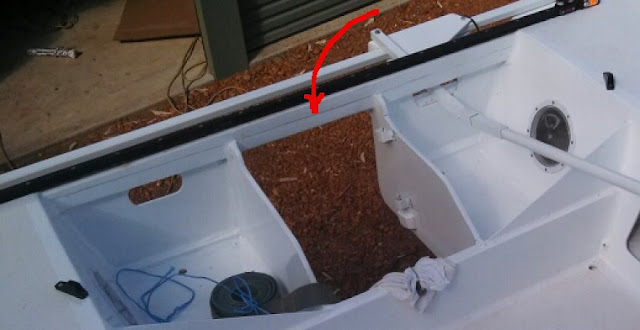
The main traveller is not supported for the entire transom width. It's screwed down hard at each end for about 150mm but has a 6mm gap to the top of the transom for most of its length.
You can see the gap in this picture.

The traveller is pulled down to reduce the gap to about 4mm in the middle. The gap near the ends is about 7mm.
There has been some attempt to use plastic spacers on the screws but at least one doesn't have anything.

My plan is to get some 6mm thick hardwood, seal it, then epoxy it to the top of the transom. The existing screws appear to be long enough and they will be epoxied in and will be the main strength for holding the traveller down.

Should I just use a bedding compound or epoxy the "filler" to the transom?
I doubt the screws will hold into the hardwood filler very well anyway.

Alternatively I have spotted a 6mm thick PVC section that I could use instead of timber but since epoxy won't hold it hardly at all it would indeed be just a filler piece.

What is also a little disturbing (what isn't about this boat?) is that the transom appears to have been made incorrectly then repaired. Note the 40mm deep top of the transom where it has been attached to the transom below it. How well is it secured? I don't know! If that 40mm (odd) deep section was 7mm thicker there would not have been an issue!

I'm tempted at at least add two full length m5 bolts and nuts (if they'll fit, else m4 or 5/32") through the traveller and top-of-transom down to either side of (inside) the motor well. Maybe I can even add more than that.

I have also just found that I can buy 8g Stainless Steel screws up to 3 inches in length. Those sunk into epoxied holes would hold the whole lot together.

As always - comments welcome.

Rudder box Reduction & Trailer modification

I spent a couple of hours sanding down the rudder boxes at the position where I want to re-mount the gudgeons yesterday. I had to take about 2mm off the width of the boxes to allow the gudgeons to slide on reasonably easily. Once they were sanded back enough I applied two coats of thinned Bote-cote to the now-raw timber - allowing a day in between coats.

The rudder box below is precariously balanced here so as to allow the epoxy to settle into the gaps - see the reason below. I have also marked the gudgeons as to where they will be used as they vary in gap slightly.

I added some filler to the left-over Bote-cote and dribbled it into the un-sealed gaps in the rudder boxes. This apparently should have been fibre-glassed during assembly - but no...

I have sealed about half the gaps so far. It's a good use for left-over Bote-cote each time I mix up a batch.


On other matters - I have been gouging our driveway curb each time I take the boat on and off our property. (I think there is a similar gouge in Vicroads driveway.)
You can see an old and a new gouge here.

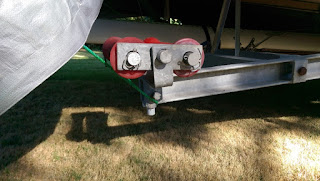
The rear double rollers on the trailer had not had the excess taken off the vertical bars so it left gouges every time the trailer went into a dip - like a driveway. It's not good for the trailer or boat when the trailer gets hung up on the curb either.  I'm REALLY hoping that I don't need the rollers to be adjusted up!

Rear right removed and cut down (with hacksaw - about 15 minutes each bar).

 Cut-down rear right.
I did the right hand side a couple of weeks ago but I could not get the left side off this morning (no matter how much cajoling I did with my hammer) so I took to it with the angle grinder and a cut-off wheel. I painted it in situ.
It was a lot quicker - but noisier and pretty fiery. I carefully figured the angle for the spark trail so as not to harm the boat. Sorry no pictures as no-one else was home.

Sunday 26 November 2017

Pintle Mount Shock

I have been a bit time poor for the past few weeks - that should change near Christmas, but I managed to get my phone (camera) into the buoyancy chambers that have the top pintle mount backing plates in them.
Oh dear...

The port side


The starboard side

Pine!!! He almost missed the backing plate too...

I removed the bolts (and pintle) from the starboard side (I can't do the port without someone to hold the spanner) and tried to move the pine but it is solidly glued (epoxied) on. I haven't tried REALLY hard to move it yet - I'm trying to get advise on this. At this point I think the path of least damage is to retain the pine. This area is well above the waterline with the floor that you can see on the same level as the cockpit floor - probably 600mm above the water. The hull-beds are below this chamber so it should never see water - pine should be OK - yes?

Keep in mind that I can't see what I'm doing  - the pictures make it look simple to get access but that is via a 6" round access hatch (port side shown below). It'll be "feel your way".

My plan for the starboard side is to place another piece of 50mm x 19mm pine with and 'L' shape cut out of it around the corner near the bolts and (Bote-cote with thickener) glue it to the existing pine and the transom. The reason I'll use more pine is to keep the "squashability" the same.
Then I'll coat the whole lot on port and starboard with thinned epoxy (I'll pre-coat my new piece too).

I will fill and seal the inner two bolt holes then, when I refit the pintles, I will only use the two outside bolts with oversize washers that will span the existing and new parts of the backing plate. I'm reasoning here that two 1/4" Stainless Steel bolts are strong enough for one 8mm pintle mount.

Saturday 25 November 2017

Rudder Changes

Here is a look at the rudder arrangement on our Jarcat. This picture is from the sellers advertisement.

It's not obvious from the picture, but the port (left) rudder is 25mm away from the bottom of the hull when the rudder is fully down. The starboard (right) rudder clears by a massive 50mm. The advise is that this should be about 2mm. As it is now, the rudder boxes will drag in the water and the rudders will collect seaweed and garbage.

The rudder pintles (the pivot pins) are mounted on the transom (the back vertical bit of the boat). The gudgeons - the bits with the hole that drops over the pintle, are mounted on the rudders - more correctly the rudder boxes  (these are the things that the kick-up rudders fold into and are pivoted from).

My plan is to move the gudgeons down on the rudder boxes. The cross-arm connecting the port and starboard rudder boxes and the tiller arrangement will then have to be re-worked. The tiller will end up below the cross-arm - in the picture it's above the cross-arm.

This picture show why the tiller is a "chuck away". It hits you in the kneecap and in no way clears the outboard motor.

Here are the rudder boxes removed from the boat, the gudgeons removed, and the gudgeon mounting holes filled.


To fill the holes, I used 1/4" hardwood dowel cut about 10-12mm shorter than the length of the hole. I squashed one end so it would stay put in the hole equidistantly from each end then I blocked the lower end of the hole with masking tape and filled the hole with slightly thickened epoxy - it took a while for it to dribble down.

In the same picture (click on the picture for a better look) you can see the rudder gudgeons. Another small surprise - two different brands - Ronstan and Riley. The Ronstan (the ones with the flange filled in) were on the starboard rudder box and the Riley on the port. Ronstan (RF905 - no longer available nor is the RF2505) have a 52mm gap (the rudder boxes are 52-53mm) and Riley (RM591) have a 51mm gap (they measure 50mm). There will have to be some sanding and repainting to fit them. I will also place Ronstan on the top and Riley on the bottom - just for symmetry. At least something will be symmetrical- more on that later...

Tuesday 21 November 2017

VicRoads today

I was at VicRoads today getting the trailer and boat registered. The left indicator didn't work - can you believe it? A quick trip to a service station and back for a BA15S globe. VicRoads staff (Sara) was very accommodating. Astonishing that when I made the phone booking for inspecting the trailer and registering the boat, the person on the phone made the boat appointment immediately after the trailer appointment. Turns out that the boat appointment was YESTERDAY. Sara just fitted me in around other appointments.

Trailer passed and our Jarcat is now registered.
A strange coincidence was that I pulled up next to another Outlander PHEV in the inspection bay. That's our tow car and they are not common. I have a small blog on the PHEV.

William commented that I still call the boat either "the boat" or "the Jarcat", not Kismet (he noticed when I called it Kismet in a Whatsapp (text) message). That's because we haven't REALLY decided on the name so I don't want to have to go back and edit posts to change the name if it changes. I like Kismet - more than likely that will be it.

I put the boat back on the front lawn in a slightly different position so as to minimise damage to our lawn. Since I didn't have William's help (he's in Tanzania with Projects abroad), I came up with a less strenuous way of parking the boat and getting the car out from in front of it. It will also make it easier to turn the trailer to point out the driveway when we are taking it out again.
(I drive the trailer in forwards for increased security.)

I spent a couple of hours tonight removing duct tape from the mast where it was holding rigging in place and replacing it with either camstraps or rope. In one place the duct tape had been there so long it tore some paint of the mast. I also re-positioned the mast so we could test fit the outboard on the boat.

Tuesday 31 October 2017

Out of Storage for the Cup Weekend

I picked up the Jarcat from its storage place after work today. It'll be home for the Melbourne Cup weekend and a few weeks after that to let me get started on making it seaworthy.

The Melbourne Cup  is a horse race that gives us a public holiday on a Tuesday - so many folk take the Monday off as well.

Tuesday 26 September 2017

Jarcat stored

The Jarcat will have its home away from home in a storage place 1/2 hour from home. It's in storage for a few weeks until I get time to arrange registration.
It doesn't look too flash but it'll keep the boat dry and safe.

Saturday 23 September 2017

Preliminary checkout and To Do List

Once home and the family and I had checked out the boat, I tarped it up (I had measured the tarpaulin size previously) and waited for the weekend.

On the weekend, Don, a Jarcat guru conveniently living 30 minutes away from me, had a look at the Jarcat. With his help and over the next few weeks I compiled the To Do list:
  1. Remove the tiller and discard it. It's way too low and can't steer without hitting either the outboard motor or my knees. It's also built like an afterthought.
  2. Remove all the rudder gear and remount the rudders 25mm higher for port and 50mm higher  for starboard. This will either be by moving the Pintle mounts on the transom or moving the gudgeons lower on the rudder boxes.
  3. Remove the pintles from the transom, align, seal and remount. They are not aligned correctly. To compensate for this, the top pintle mount has been left "loose" - not OK.
  4. Seal the rudder box insides. Apparently they should have been fibreglassed during assembly but the cracks where wood joins wood are clearly visible. I will have to dribble thickened epoxy into the joins. (I have already bought Bote-cote epoxy and a sample pack of Aqua-cote paint).
  5. Modify the transom so the motor can tilt. After test fitting the motor we found that it could only tilt when put "hard over".
  6. Rework the rudder cross arm height to ensure that the motor in its tilted position clears the rudder cross arm.
  7. Remove all tracks from the boat and epoxy the fasteners in. They are only sealed with a tiny bit of silicone currently. The front "Tacktrack" has the job of holding the front mast stay -so it's important it doesn't fail. The Jib tracks and main traveller aren't quite as critical but they should be properly installed.
  8. Seal front and rear docking cleats and anchor cleat with Sikaflex 291. Currently they are sparingly sealed with silicone and feel weak. I won't epoxy these in as I may well change them for 6" Stainless Steel if I don't think the current 5 1/2" nylon cleats are strong enough.
  9. Cut the rearmost trailer roller mounting down. They extend 150mm below the trailer at the moment. I reckon I have put a gouge in a few places (driveways) going to and fro getting the boat ready.
  10. Fit Jib blocks and cam cleats. I'll have second Jib blocks near the cabin as per Don's setup.
  11. Once the rudders are back on, build a whole new tiller setup.
  12. Extend the chainplates (they hold the mast backstays to the boat). They appear to be the right length but there is only one 3/16" bolt holding them inside the hulls. I think the length below the deck was lost to a slightly higher combing above deck. I will drill the hole out to 6mm and add an extension piece of SS (using that bolt) and more epoxied hardwood to hold it in place. Then another 6mm bolt through the hull. I will tension the join to the main chainplate 6mm bolt when fitting the extension SS.
There's more - and more detail - but that's about the crux of it.

Thursday 21 September 2017

Picking up the Jarcat from MIRRAT (Port Melbourne)

After lots of ringing around and emails, I had decided to bring the boat from Perth to Melbourne via sea. The ship bringing here got delayed so the Jarcat spent about a week sitting in the terminal car park at Freemantle. Finally I got news (after pestering them) that the boat was arriving and would be ready for pickup today.

It's amazing the stuff that goes on that, until you have a need, you just don't know is happening.
Take MIRRAT - Melbourne International Rollon-Rolloff Automotive Terminal, for example.

The guys at MIRRAT appeared to all know about the "Jetcat". The paperwork I submitted said "Jarcat", but somewhere along the way the boat got a lot faster... I imagine they thought the Jet engines would be fitted later. Anyway, after watching a 20 minute indoctrination (safety) video and doing a questionnaire I was allowed on site. The Jarcat was sitting all alone in a very large warehouse awaiting pick-up.

My MIRRAT guide and I connected the trailer up to my tow-car and tested out the lights on the light-board (detachable trailer lights that mount on the back of the boat during towing). The right indicator started smoking then went out - other wise all was well - my adaptor purchased a few weeks earlier FITTED!. After I got out of the MIRRAT complex I stopped in a large parking bay and checked everything out. Sure enough the right indicator globe glass envelope was broken. No spare, so no right indicator for the trip home - unless I could find a service station along the way. I checked all the tie downs and ropes then started for home - what a stressful journey that was!

The Jarcat is 2.5 meters wide and has to be the scariest thing I have ever towed. Our caravan is 2.2M but the extra 300mm makes a big difference. On my trip home I managed to miss getting on the M1 Freeway and ended up going up St Kilda road - an overcrowded road near the CBD of Melbourne. The traffic lanes there were just a tad narrower than the Jarcat trailer. At one stage I had one wheel running along the kerb and the other running over the cats eyes between the lanes. I managed to swing a right turn near the Melbourne War Memorial and after a few more stressful moments (remember no right indicator) was back on the freeway. It was better from that point on.

I was very glad to get home unscathed.

Sunday 3 September 2017

Your Boat is on its way

The seller, Roy, had gone overseas for a few weeks over winter so we both decided that we would leave getting the Jarcat to Melbourne until he was back and settled. This would give me enough time to chase various shipping options.

The Jarcat was picked up from the sellers home in the outer suburbs of Perth today.
It will be coming to Melbourne by ship.

Monday 12 June 2017

Quick trip to Perth

On June 10th, William (18 year old son) and I flew to Perth for a day.
Jetstar there and Tiger back (cheapest flights available) - no luggage.
Roy (the seller) picked us up at the airport and drove us out to his rural(ish) property to have a look at the Jarcat.

Roy and I had already come to some understanding about price so we both knew that unless something was obviously wrong we would be signing up to buy the boat on the day. William was immediately struck by the Jarcat and he had no qualms spending someone else's money - I held out for at least another half hour.

There were a couple of things that bothered me but nothing a little re-organizing/fabricating couldn't fix. Roy pointed out some of the things that hadn't been done and had good reasons why he left it to a new owner - more on that in later posts. Roy's wife had a prepared lunch for us which was gratefully received.


I got into trouble for the lack of pictures that I took while looking at the boat. I was really glad that this was one of three that I took as it allowed me to purchase the correct adaptor to go to the 12 pin flat socket on my tow vehicle (outlander PHEV).


Once the deal was done and a deposit paid via bank transfer (I showed him the transaction on my phone), Roy drove us back into Perth and showed us around a bit. We quickly realised why Perth is such a favourite place for sailing (despite the bridges).

Friday 2 June 2017

Some Background

I had been looking on and off at various Catamarans over the last one and bit years but had never seen the boat that would suit my needs. I wanted something more than a "beachcat" but nothing that I had to leave moored somewhere. Why a Catamaran? I pretty much learnt to sail in my late teens and 20's on a wooden hull 16 foot Cat.

A couple of years ago we finally took the plunge and hired a bareboat (skipper yourself) 36 foot Fountaine Pajot for 7 days on the Whitsundays.
Even though the trip was a somewhat mixed bag with two of the crew staying behind in Melbourne for the first couple of days due to illness, I got hooked. My family and I hadn't realised just how much I loved sailing...

So it wasn't a huge surprise when I found Jarcats on the web. Jarcats come in 5 and 6 meter lengths and they are a trailer sailer - meaning that you can drag them around behind your car, sleep in them on land, launch them into the water and stay on them for a week or so - going somewhere!


Somewhere in the first part of 2017 I stumbled (searched and found?) upon a Jarcat that had been almost finished but never launched - but it was expensive AND in Perth, nearly 3500 km from our home in Melbourne.

It was all the more interesting because the hulls had been extended to 6.5 meters*** (they are normally 6) - a real plus for something like a Whitsundays visit - without the huge expense.

(Picture from seller's advertisement with protective paper still on acrylic windows.)


*** This turned out to be 6.1 meters bow to transom (top of rear of boat - in fact standard length for a Jarcat 6).